Installation & Activation
We recommend connecting your site to the concrete5 community for complete automation of installation and updates for Bootstrap.
When your site is connected to the concrete5 community, you will be notified with a message in your dashboard when updates become available. Updates take just a couple of clicks.
Connect to the concrete5 community
1) In your concrete5 dashboard, click in the intelligent search on the top right and type the word "connect". This will bring up the page "connect to the community" Click the link to visit the page.
2) On concrete5.org visit My Account > Projects
3) View the project that was automatically created when you connected your site to the concrete5 community.
4) Attach the license for Bootstrap to your project.
5) In your concrete5 dashboard visit Dashboard > Install
6) Click download Bootstrap
7) Click install Bootstrap
8) Visit Dashboard > Themes
9) Click activate Bootstrap

Bootstrap for concrete5 includes 18 custom templates for concrete5's built in auto-nav block.
All custom templates accept "affix" and "cover" feature unlimited level drop down functionality.
Bootstrap framework offers a "click drop" functionality to display children pages. Parent level pages do not link to pages and are used for displaying children pages only.
If you would rather have a "hover drop" functionality with parent level pages as clickable links, Auto-Nav Pro and its included superfish custom template can be used.
Add Auto-Nav to page
1) Put page in edit mode.
2) Click on the editable area that you would like to add auto-nav to. A pop up will appear. Inside the pop up, select "add block".
3) Scroll down and select Auto-Nav.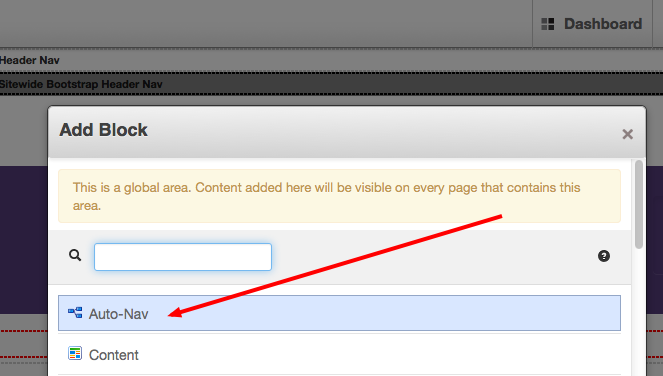
4) Configure Auto-Nav to display "all" or a "custom amount" of sub pages. Click save.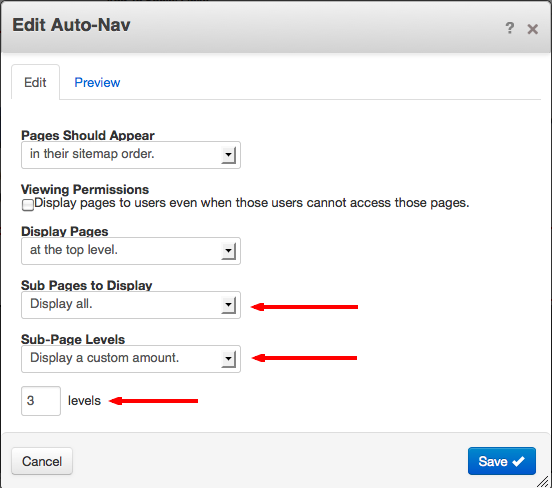
5) After the block has been added to the page, while still in edit mode, click on the Auto-Nav block and select "custom template" inside the pop up.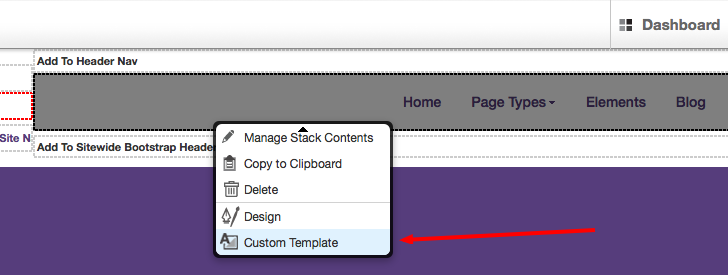
6) Select one of the 18 custom templates.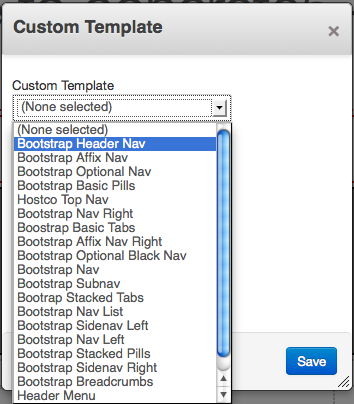

Affix
The affix custom template for auto-nav can be used as a standard single level nav or as an anchor navigation for 1 page layouts just like on this page.
Here is how to configure affix to act as an achor nav.
1) First go to your sitemap and add a new page. This page will act as a top level page (holder) for the list of anchors to display below.
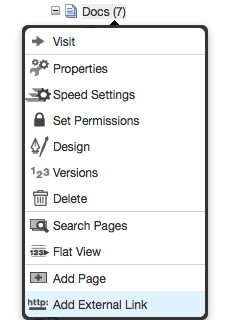
Set this page to be excluded from the nav by clicking on it selecting "properties"
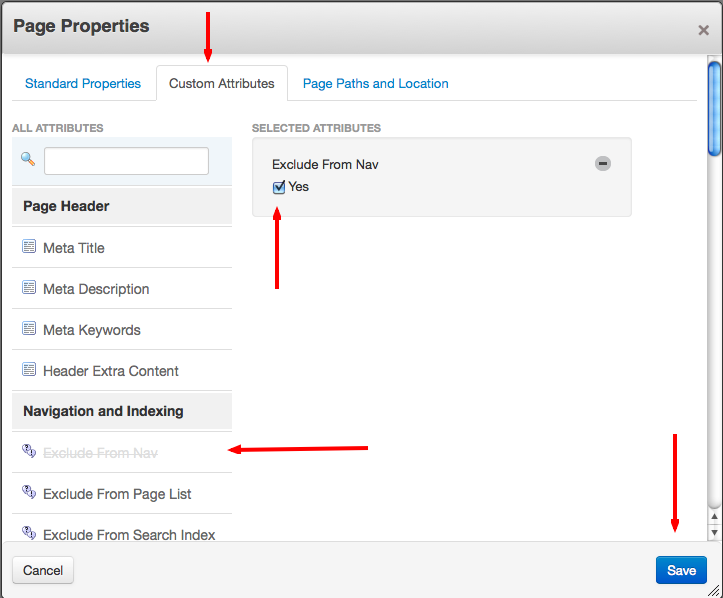
2) On the Page Properties menu under the "Custom Attributes" tab under "Navigation and Indexing" select "Exclude from Nav" check "yes" then click save.
3) Now add your list of anchor links by adding external links.
Click on the top level page you set up for the affix nav and click "Add External Link"
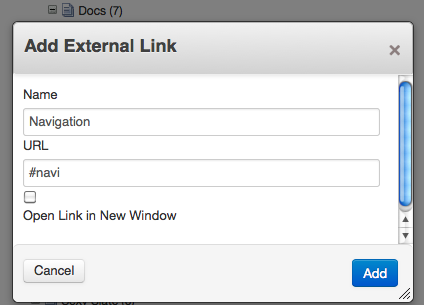
4) Input the name that you would like to appear for the link.
For the URL first add "#" followed by a shortened name of the link.
5) Last set your anchor CSS ID's using the "design" option.
The CSS ID can be set on any type of block on the page.
For example to set the anchor ID for the "Affix" documentation area on this page, we clicked on the content block that contains the "Affix" title and selected "design".
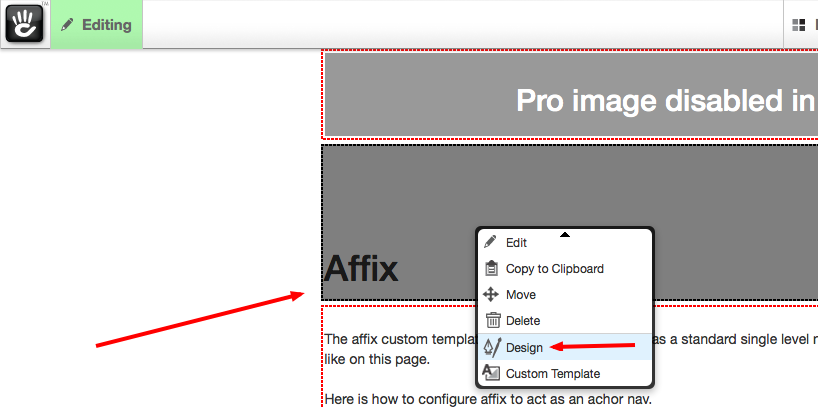
On the design window under the CSS tab, we input the name we added for the "Affix" anchor then click save.
NOTE: Do not include "#" this is only added in the sitemap when adding external links.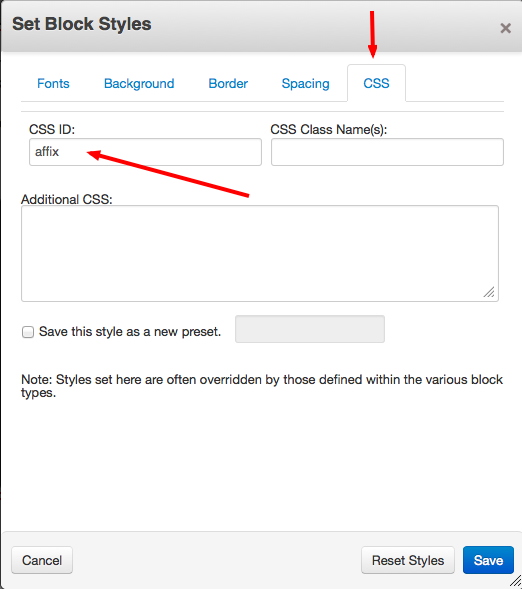

Dashboard settings

Page types
Bootstrap for concrete5 comes with 21 page types.
- Intro
- Home
- Home 2
- Home 3
- Home Carousel
- Full
- Full Title
- Full Width
- Left sidebar
- Left sidebar title
- Right sidebar
- Right sidebar title
- Offcanvas
- Offcanvas inverse
- Three column
- Marketing
- Cover
- Dashboard
- Blog Entry
- Product Detail
- Footer Nav
There are three different ways of selecting and setting a page type.
1) Select a page type on page creation
2) Select a page type from the sitemap
3) Select a page type from the edit menu on a page
When clicking "add sub page" under the edit menu or from the site map you are first given the option to select a page type.
You can change a page type for a page from the site map or from the edit menu on a page.
To select a page type from the sitemap, visit the full sitemap page located in the concrete5 dashboard.
Click on the page you would like to change the page type on.
From the drop menu select design.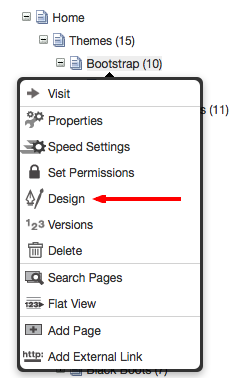
On the design window select the page type that you would like to set for your page by clicking on it, then click save.

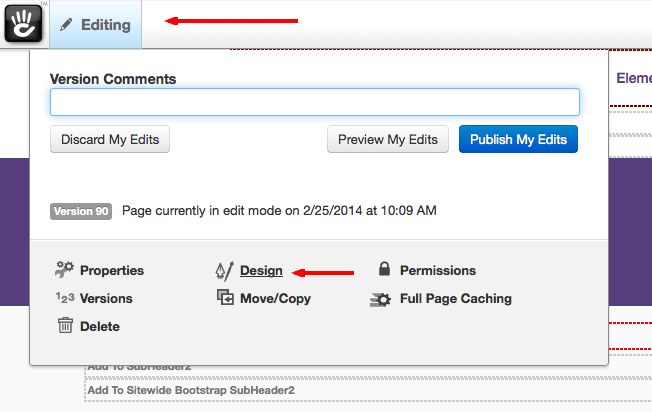
To access the design window directly from a page, hover the edit button then click the "design" link.

Composer
Composer is concrete5's built in, free, powerful blog and page creation tool.
Bootstrap for concrete5 comes with full composer support provided by a blog_entry page type and 4 custom templates listed below.
- Tags ( bootstrap well labels, bootstrap well pills, bootstrap pills)
- Page List (bootstrap thumbnail, bootstrap infinite thumbnail)
- Guest Book (bootstrap)
- Date Archive ( bootstrap well)
If you selected to skip creating a sample blog on your concrete5 installation and do not have composer set up, first you will need to manually set it up composer and activate the blog_entry page type then come back to this tutorial and proceed below. More info on how to manually set up composer and activate the blog entry_page type can be found here.
Traditional blogs have a comments section and since concrete5 provides a free block for comments, we created a custom template for it.
Setting up defaults for the composer/blog entry page type can automate the process of posting a blog post for an experience much like wordpress. By default this page is set up with a minimum amount of blocks leaving it up to you to customize for your needs.
Blog Entry Page Type Configuration
Visit
Dashboard> Page Types > Blog Entry > Defaults

eCommerce
Bootstrap for concrete5 comes with full support for concrete5's eCommerce add-on. It includeds custom templates for the following.
1) cart links
2) product list
3) product

Bootswatch
Bootstrap for concrete5 includes bootswatch.
Each bootswatch color and navigation type can be set globally or on a per page basis.
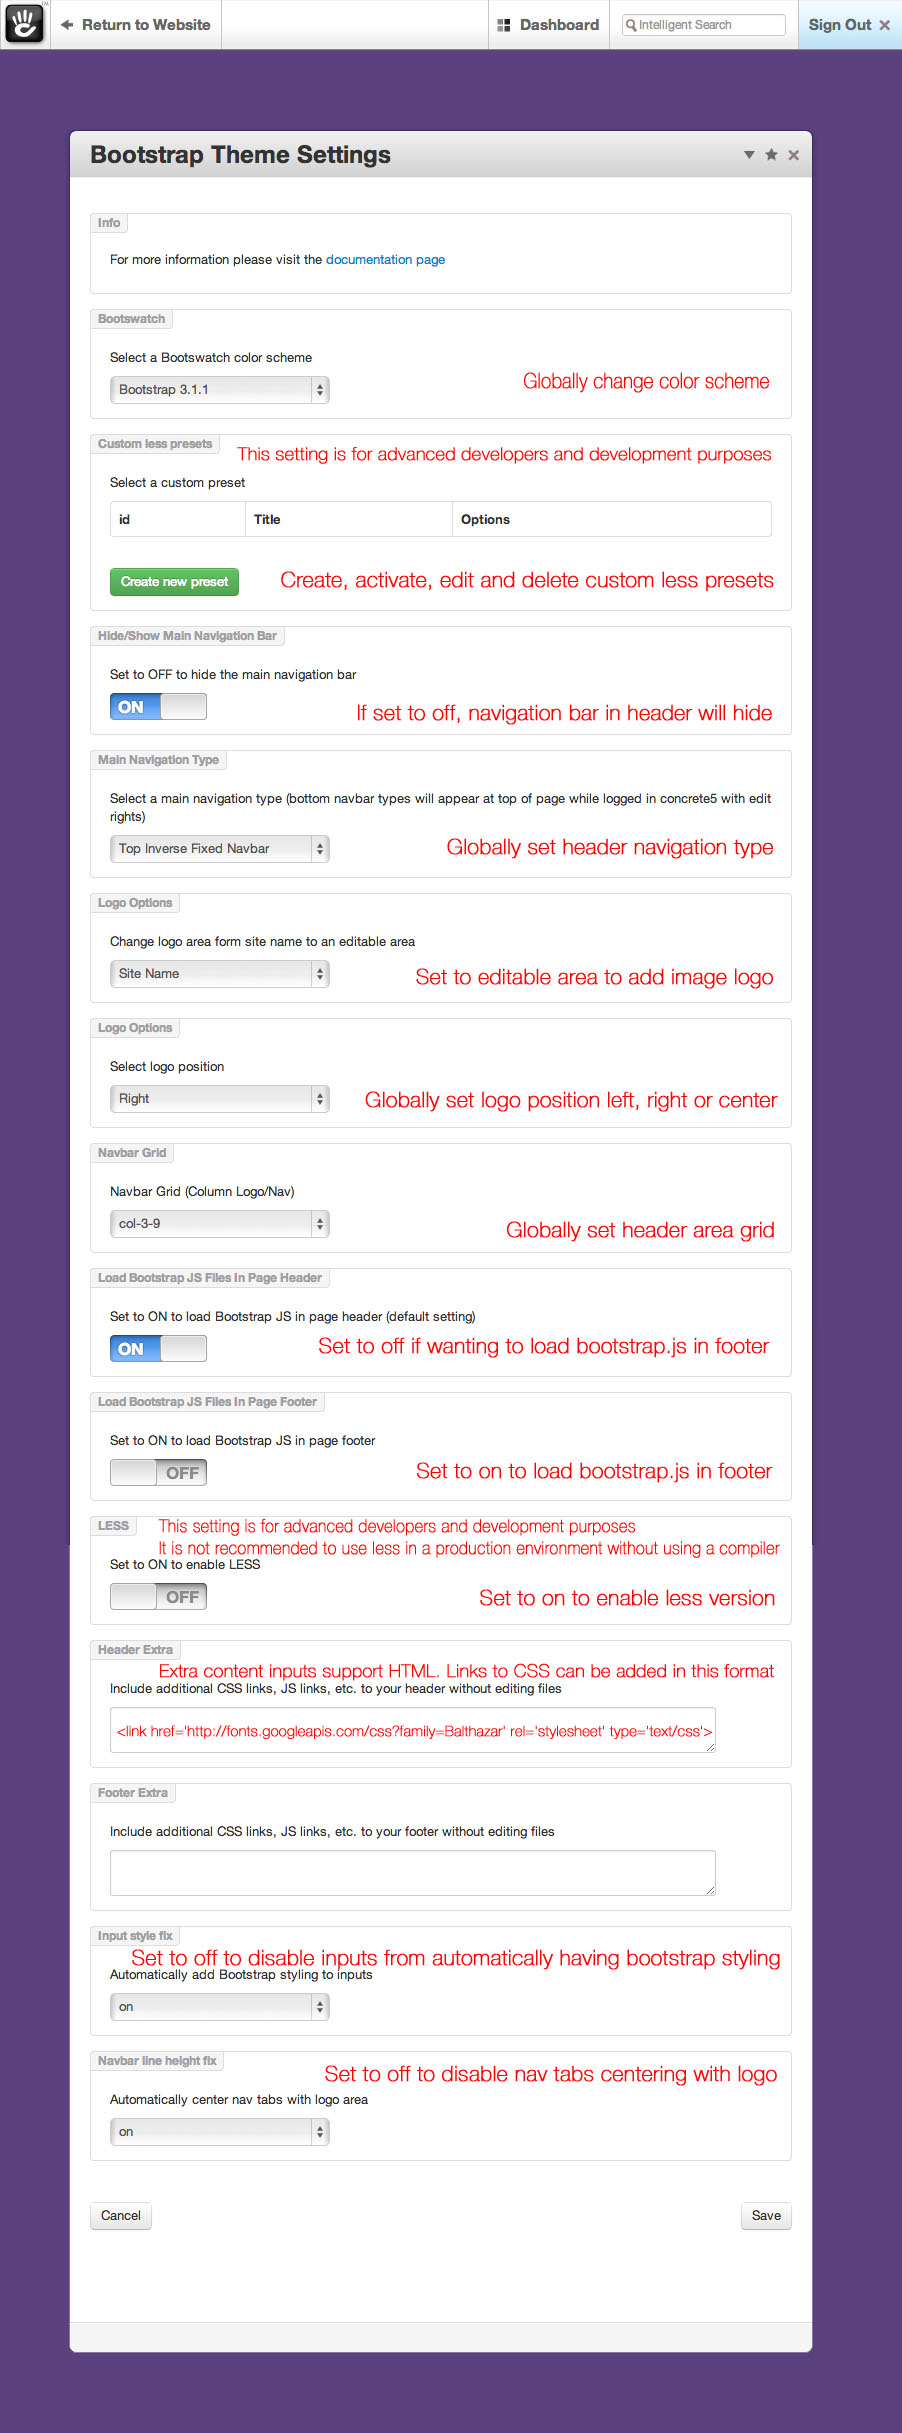
To set the bootswatch color and nav type globally visit the bootstrap theme settings page located in your dashboard.
Dashboard > Bootstrap > Settings
To set a bootswatch color and nav type on a per page basis, two custom attributes will need to be configured and activated for each page that you would like to customize.
These attributes are added from the page properties menu and can be set from two different locations.
1) On the sitemap page located in your dashboard
2) Directly from the page that you would like to change.
To add the attributes on the site map page, click on the page that you would like to change the color on and select "properties"
Select the "Custom Attributes" tab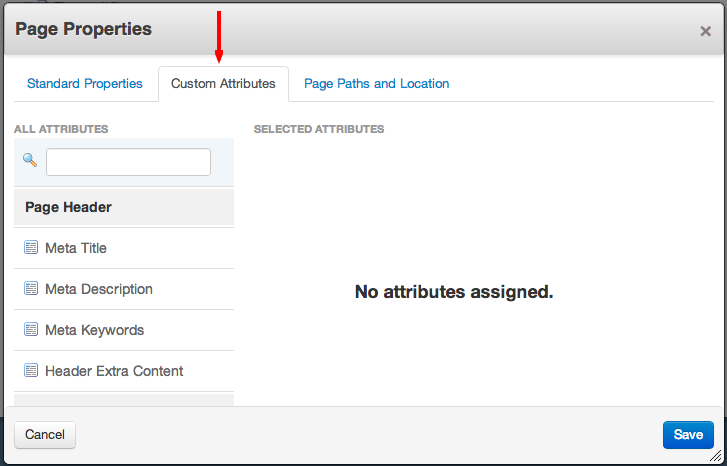
Scroll down and select the "Bootswatch Color Scheme" and "Bootstrap Main Navigation" attributes by clicking on them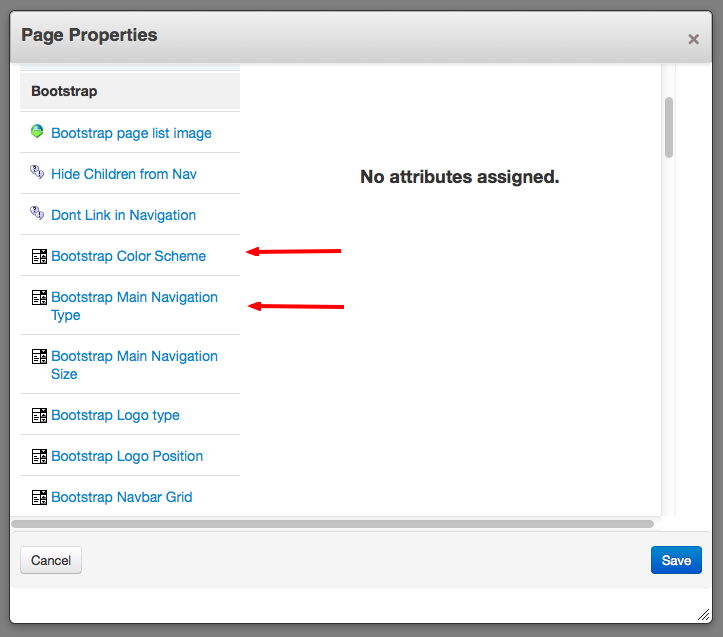
Scroll back up and select which bootswatch color and nav type that you would like to use and then click save.
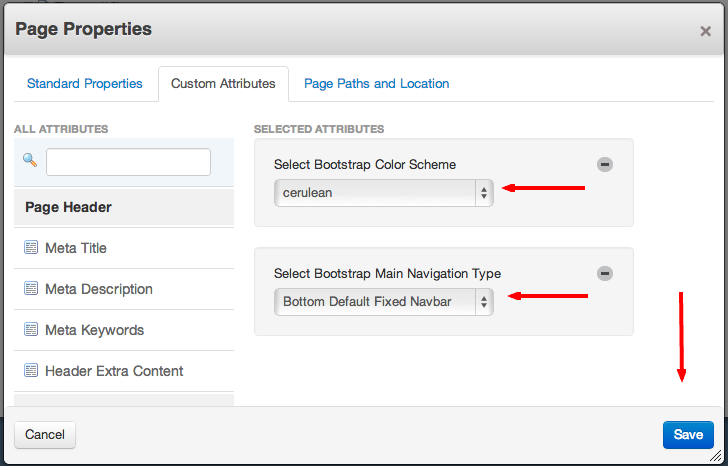
To access and add these attributes directly from a page that you are working on, hover the edit button and select "properties".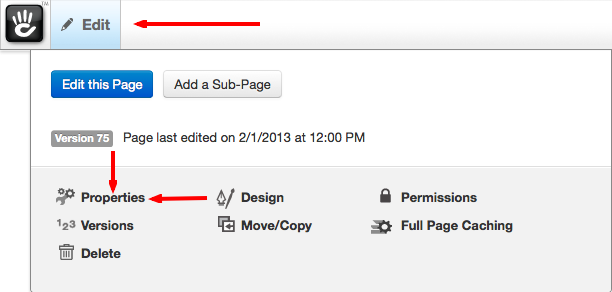

Adding Page Types
With the latest 3.1.1 version of Bootstrap for concrete5, we have optimized the themes structure to make it easier for us to keep up with future bootstrap framework versions.
If you are using a 3.0.x version of the theme, please see the older docs page for instructions on creating page types.
Bootstrap for concrete5 is more advanced then a standard concrete5 theme because it includes Bootswatch. It basically has 17 themes built into one.
Page types for Bootstrap are created different then a standard concrete5.
For example to make a new page type from a "Full" page type
duplicate this page->
/bootstrap/themes/bootstrap/full.php
rename it to
/bootstrap/themes/bootstrap/example.php
a page type is a collection of "elements"
Your new page type will contain header, full and footer elements
 echo Loader::packageElement("bootstrap/common/header", 'bootstrap');
 echo Loader::packageElement("bootstrap/common/full", 'bootstrap');
 echo Loader::packageElement("bootstrap/common/footer", 'bootstrap');
If u want to create a new element "example":
1) create a new php file inside
/bootstrap/elements/bootstrap/common/example.php
2) Add your HTML and PHP code for this element
3) Include it inside the page type like this example:
echo Loader::packageElement("bootstrap/common/example", 'bootstrap');
4) If you want to add more elements, but grouped inside a new directory, you can do that like this
packages/bootstrap/elements/bootstrap/common/new_directory
You can add this element inside a page type like this :
echo Loader::packageElement("bootstrap/common/new_directory/example", 'bootstrap');
5) Last, the page type needs to be manually activated in the concrete5 dashboard
Dashboard > Themes > Bootstrap > Inspect
!!!NOTE!!!
DO NOT add ".php" extension after the file name.
You can include elements inside other elements the same way as the page type, but DO NOT ADD ELEMENTS inside the same elements.
Less Customizer
As of v3.1.1, we now include a LESS customizer dashboard page.
Less is for advanced developers. If you do not know what Less is or how to edit it, we recommend customizing the CSS version of the theme.
We have plans to include a PHP less compiler in a future version of Bootstrap once a stable version becomes available.
We have been keeping our eye on this version
http://leafo.net/lessphp/
Unfortunately lessphp is currently broken with Bootstrap v3.1.x
https://github.com/leafo/lessphp/issues/535
Since we do not include a compiler as of yet, we still consider the Less customizer to be in a beta stage.
NOTE: We do not recommend using Less in a production environment without the use of a compiler.
There are many 3rd party tools that allow you to compile your files and watch for changes.
The easiest way to install Less on your server is via npm, the node.js package manager.
More information on Less can be found here.